
Eberhart Signature Saddle (ESS)
For hunters considering purchasing a 2 panel ESS or that have one, this page will walk you through all aspects of it including familiarizing yourself with its parts, properly putting an ESS on and the advantages it has over other saddles.
To begin, looking at the 3 pictures on the YouTube video (above) you will notice John in a shooting position using 3 different ESS seat depths. Being able to decrease or broaden the seats depth is a HUGE advantage for differing hunting circumstances, versatility and overall comfort.
After 41 years of exclusively hunting from a saddle, taking 44 book bucks from a 2 panel saddle, aiding in designing saddles for the top 3 saddle companies and sitting in more saddle designs than likely anyone, John considers the ESS to be the Cadillac of all saddles and every single design feature he put into it has a specific reason for being what it is and all those features are explained and shown in the above YouTube video.
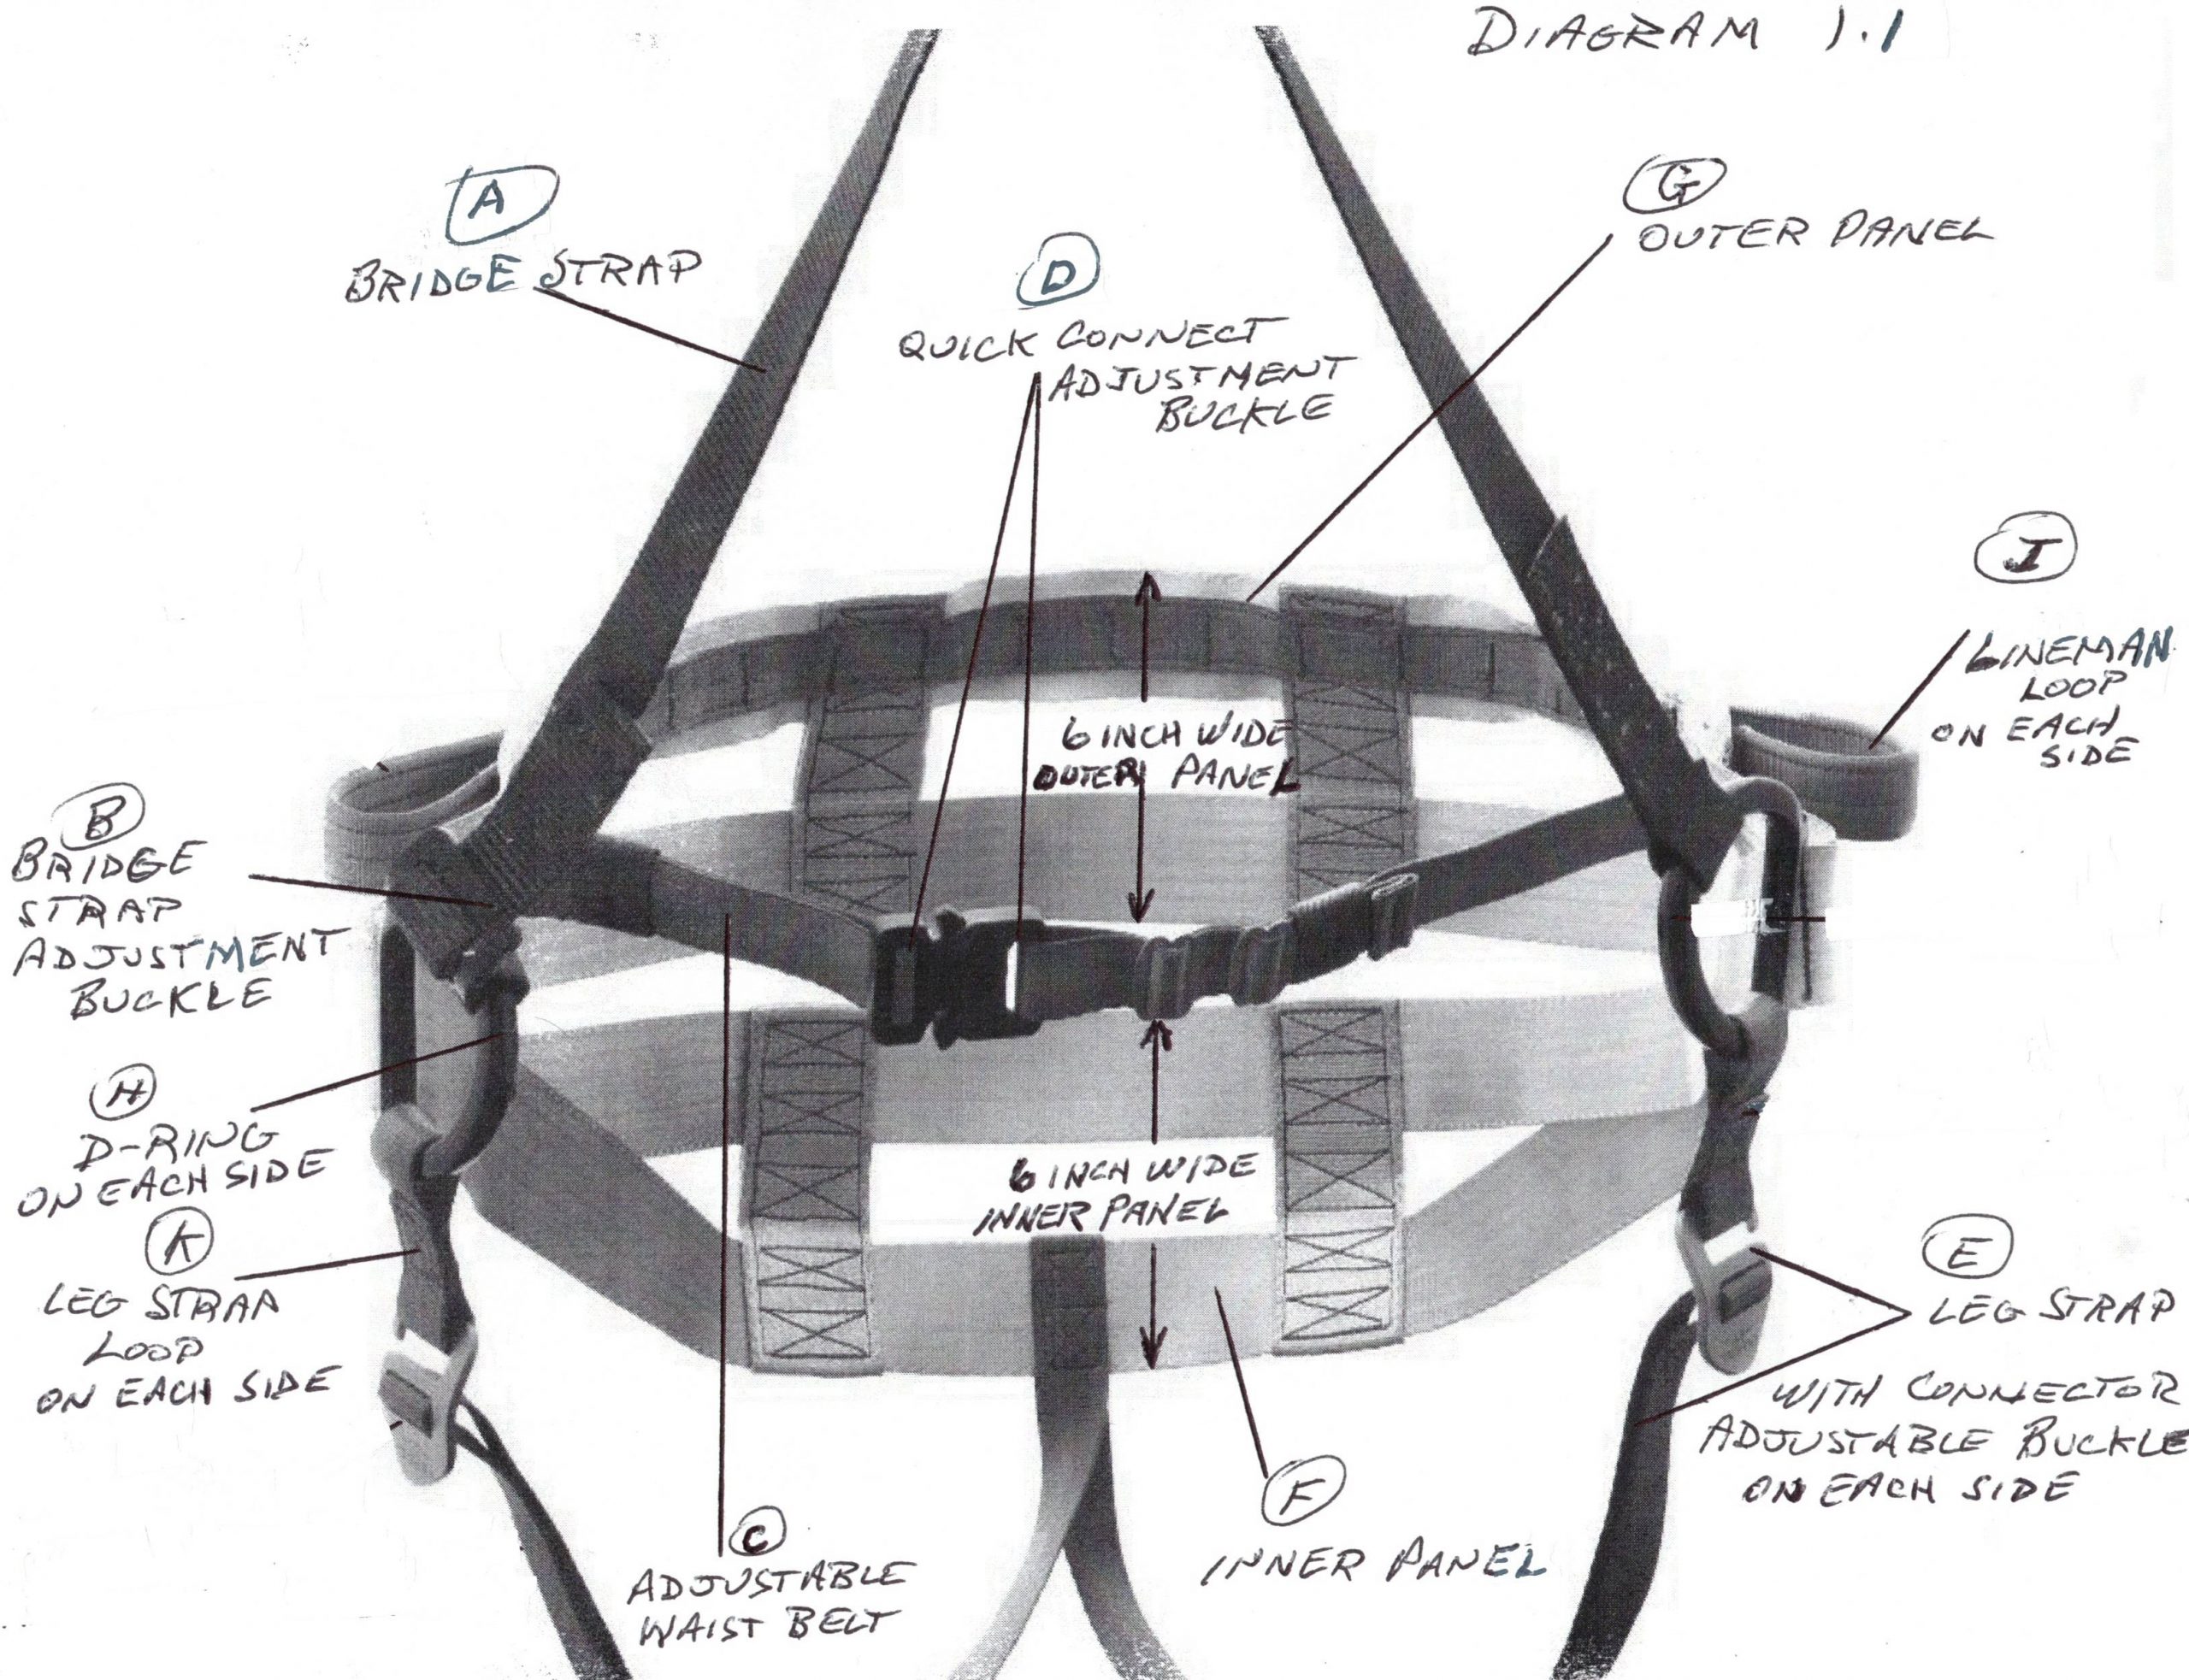
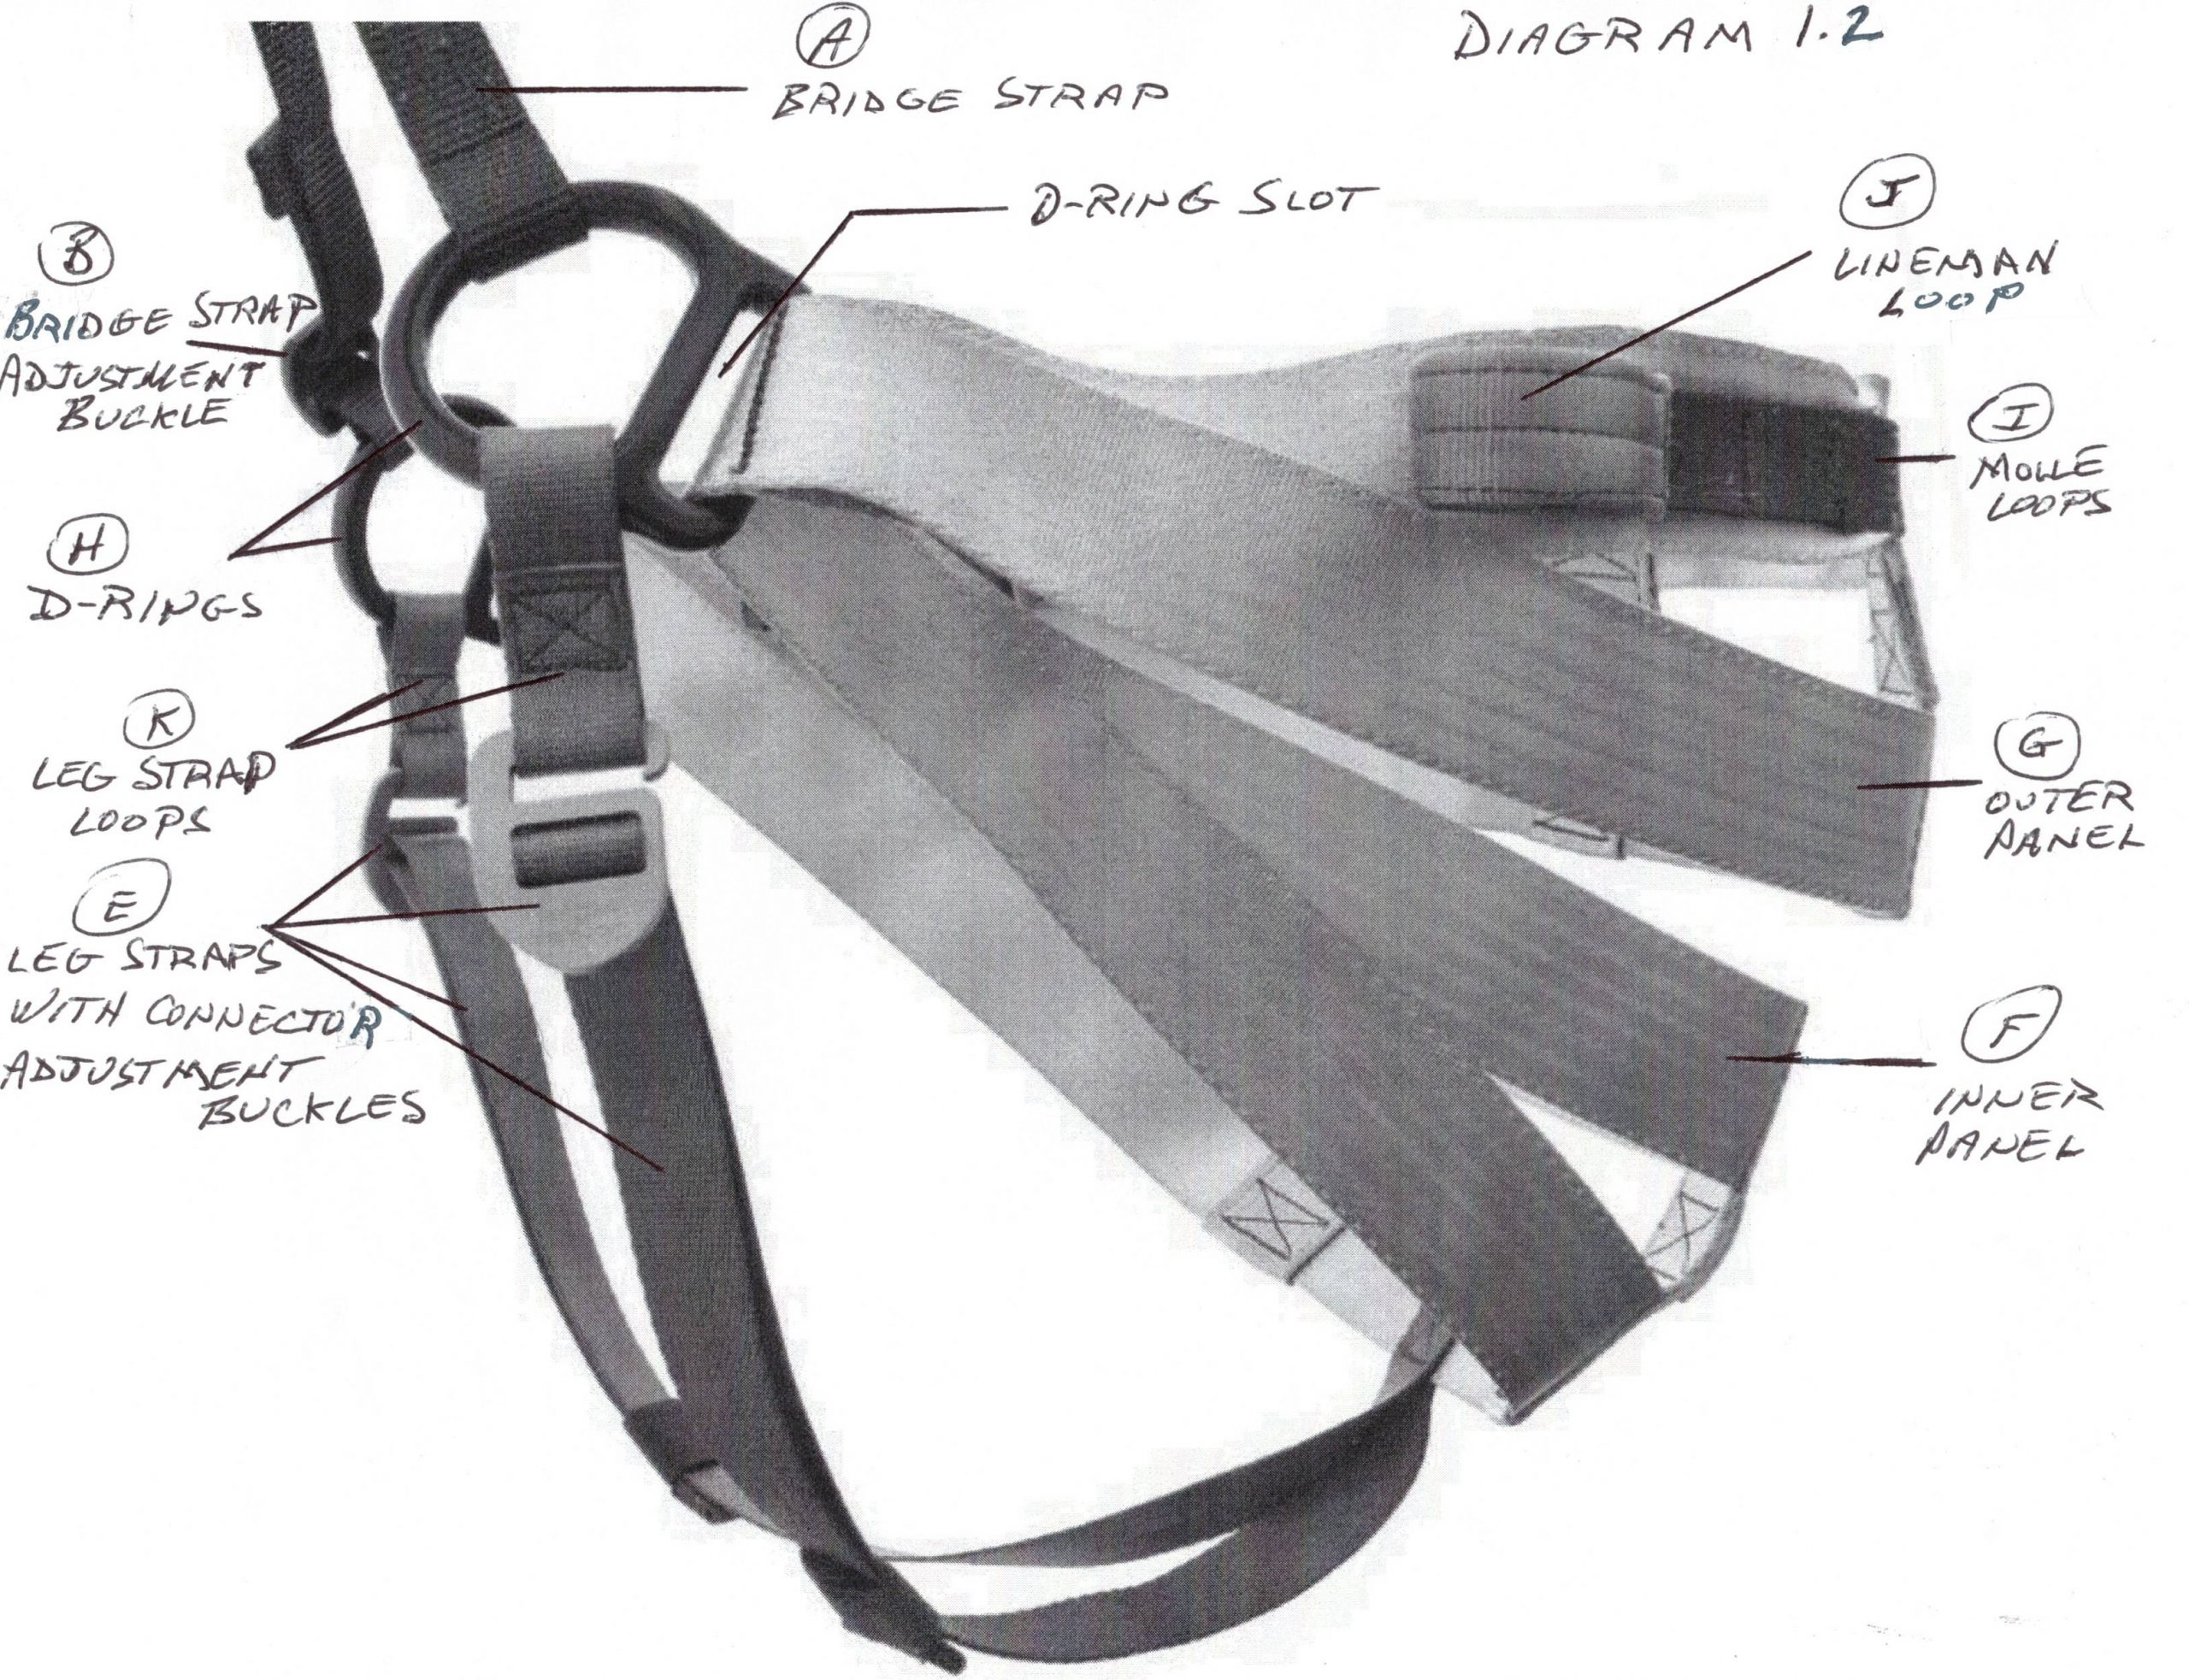
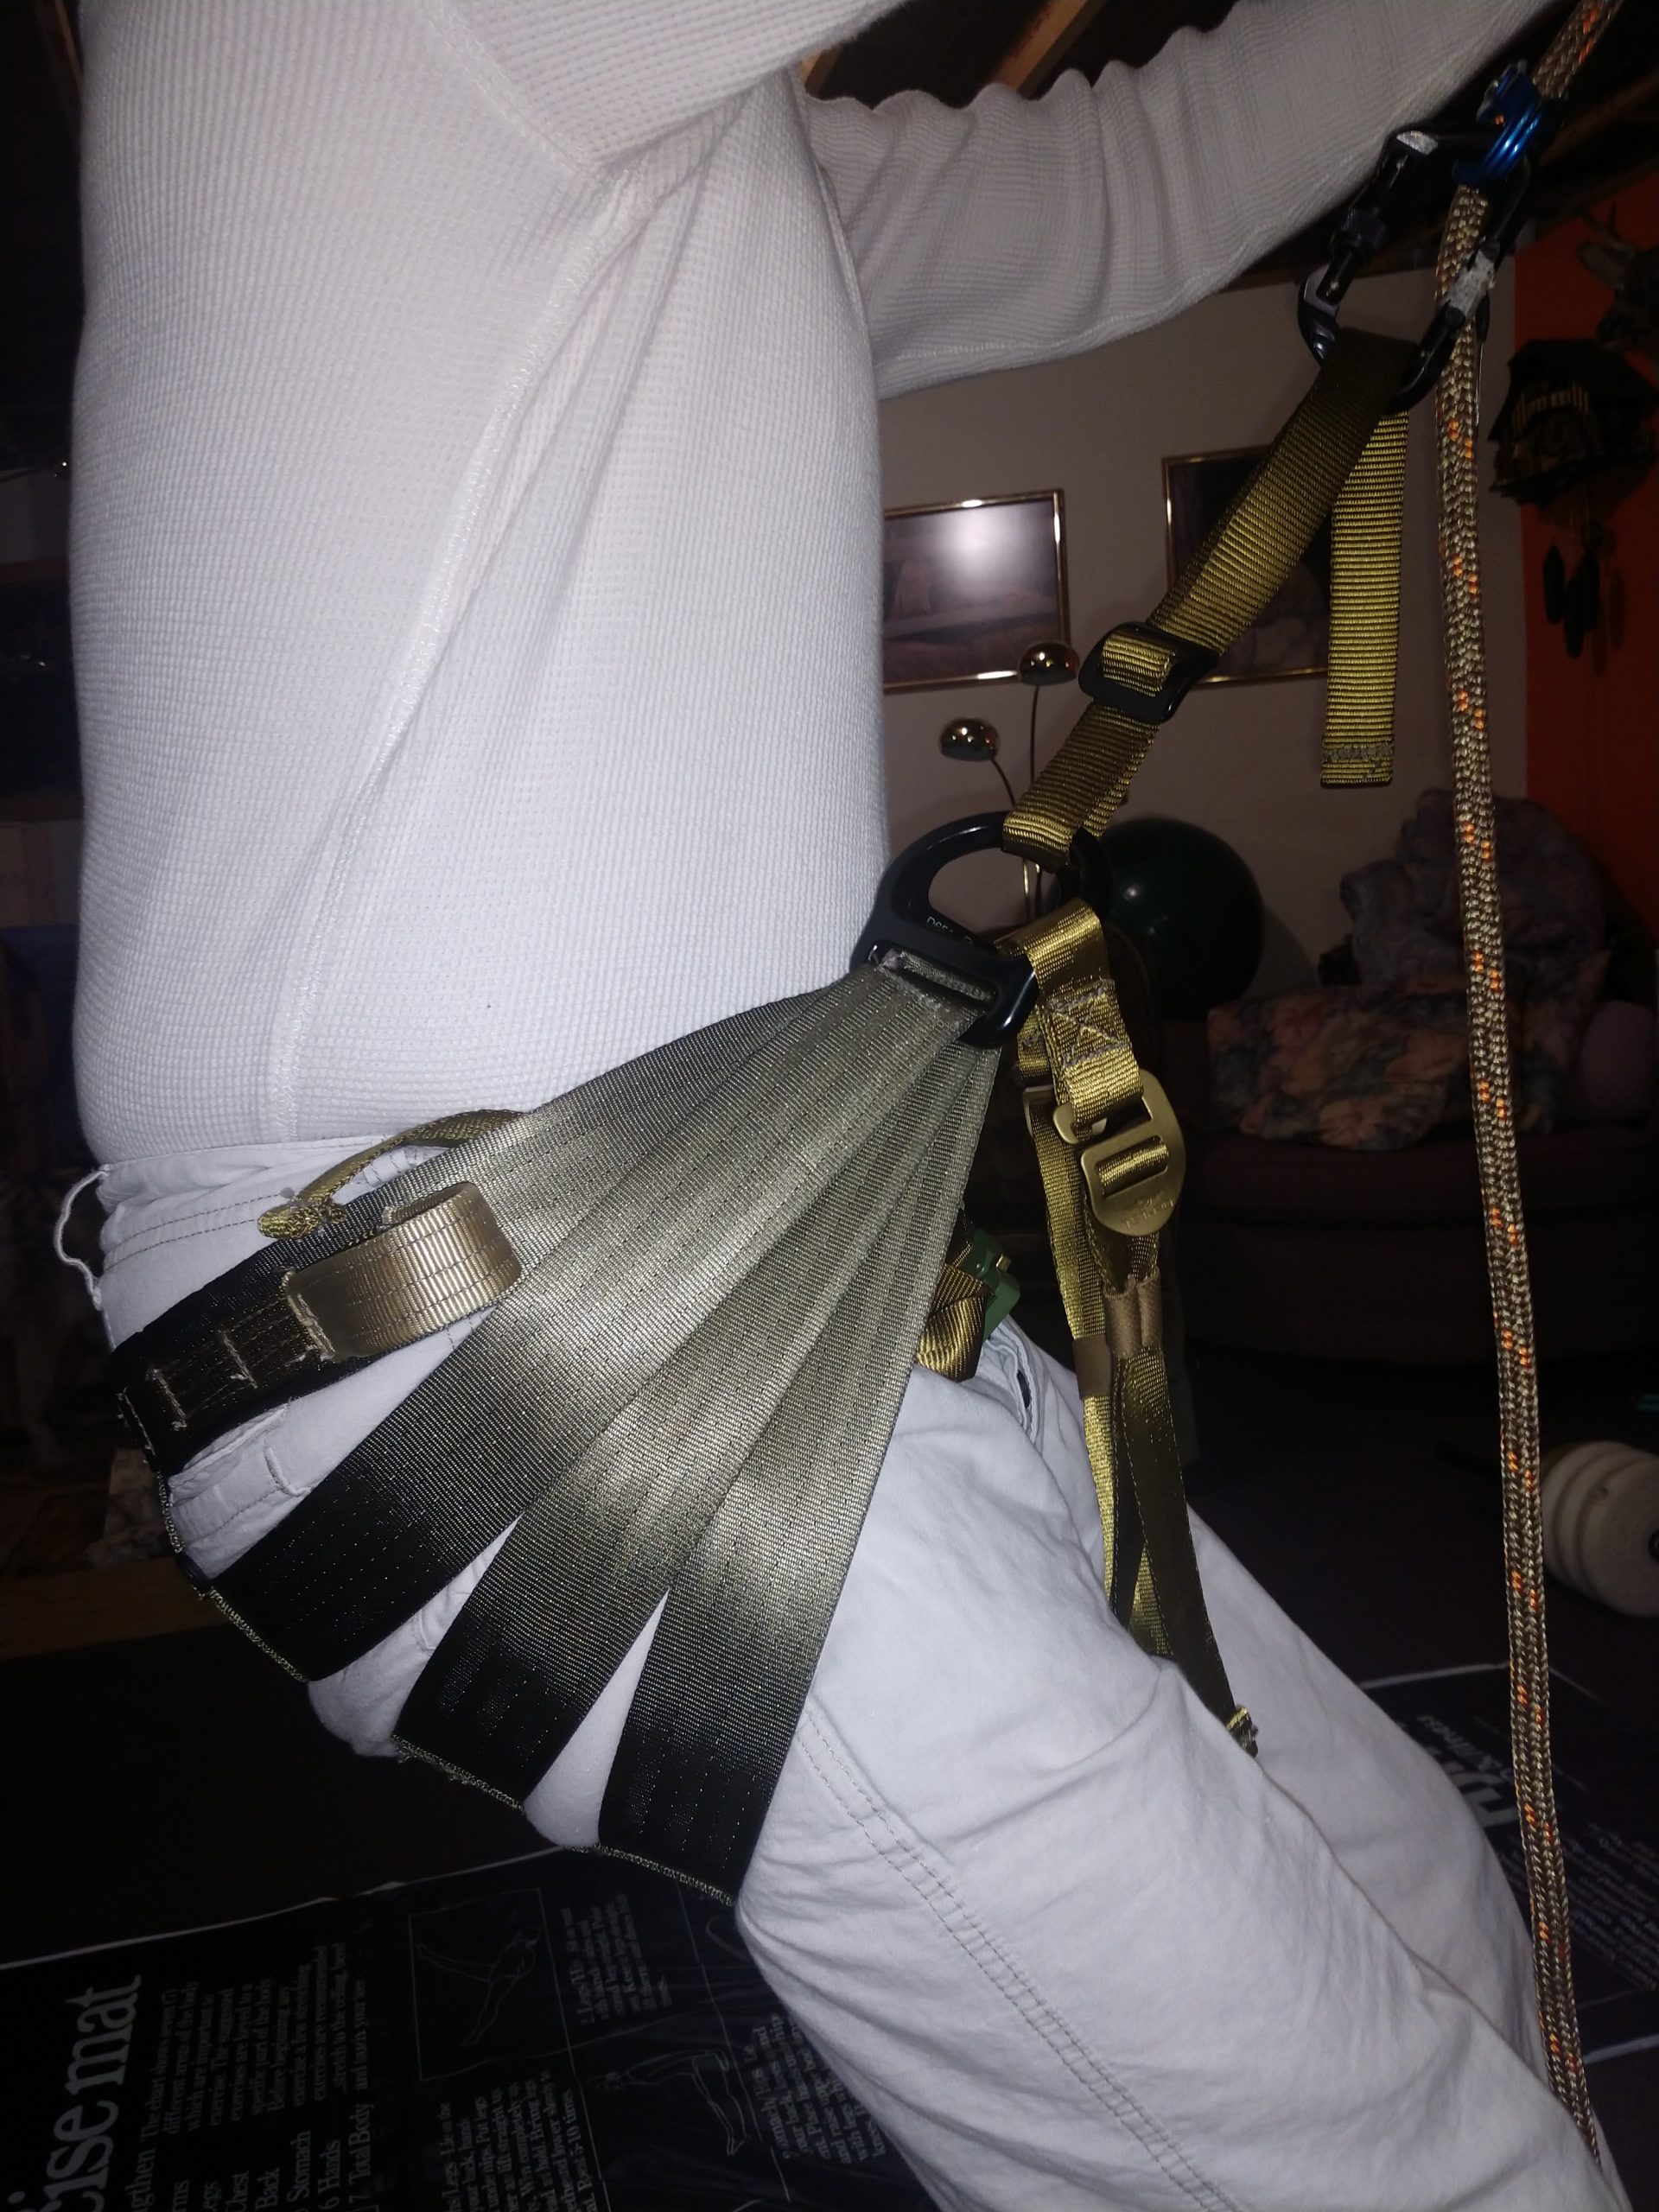
Below are diagram images of an ESS from the front and side with all its parts lettered and named to assist in familiarizing yourself with the saddle. The 3rd picture is John Eberhart in an ESS showing the most common seat depth used during a hunt.
Putting on your 2 panel Eberhart Signature Saddle (takes about 15 seconds)
*Before putting on the saddle adjust the length of the bridge strap to 18 inches from D-ring to D-ring.
- Unbuckle the adjustment buckle on the waist belt and with one hand, grab the bridge strap in the middle and lift the saddle in a manner that the bridge strap adjustment buckle will be on the right side of your hand.
- With your other hand, level out the 2 panels and then push down on the inner panel until it touches and evenly overlaps the outer panel. At this point the 2 cross braces on each panel should be evenly overlapped and the leg straps should be dangling out front of the inner panel.
- While still holding the bridge strap and keeping the 2 panels evenly overlapped and touching each other, pull the male and female ends of the waist belt buckle out so that they are exposed and dangling out the backside of the saddle (towards you).
- While still holding onto the bridge strap and with both panels remaining overlapped, with your free hand reach below the D-Rings and firmly grasp both panel sides just below the D-ring slots.
- Let go of the bridge strap and with that hand remove one of the sides below the D-Ring slots from your other hand. At this point each hand should be firmly grasping a side of the saddle just below their respective D-ring slots with the panels still evenly overlapped.
- Move your hands apart until there is an opening between the bridge strap and the evenly overlapped panels that you can easily step through. Step through the opening and with a slight side to side motion, wiggle the overlapped saddle panels up the back of your legs and over your butt until they are above your waist.
- With the saddle panels being overlapped and now against your lower back, while keeping the panel taught against your back, bring both hands together and grasp both panels just below the D-Ring slots into one hand. With your free hand connect the male and female ends of the waist belt buckle together and firmly tighten the belt. Because the inner panel is overlapped by the outer panel, tightening the waist belt on the outer panel will hold the inner panel in place.
- Let go with both hands and reach down and pull up the leg straps and hook them to the leg strap loops on the D-Rings. The leg straps may need to be adjusted out longer prior to hooking them on and they should hang loose once on. Now you are ready for long walks in and for climbing.
*I DO NOT suggest using pouches with an ESS as they will want to pull down the outer panel due to the weight in them. I carry a backpack and have always kept my lineman and tree tether ropes in it until I get to the tree at which time I put on the lineman rope and adjust it to the trees diameter, climb the tree, hang up my pack, take the tree tether out of my pack, hook it up and adjust it, disconnect the lineman rope and put it in my pack, and hunt. There is no reason to ever use a pouch if you carry a fanny or backpack.
*If you wear your ESS on entries and exits, you can use your lineman rope to keep the bridge from dangling and to keep everything tight. Pull the sliding carabiner to the end of the lineman rope. Hook the carabiner on the loop end of the lineman rope to the bridge strap and wrap the lineman rope around you until it reaches the end. Hook the sliding carabiner to a lineman loop or D-ring or whatever, and then slide the carabiner back down the lineman rope which will tighten everything on the ESS up.
Climbing the tree with your ESS and hooking up.
*With an ESS I do not recommend using pouches to store your ropes or anything else in. There is absolutely no reason whatsoever to have pouches hooked to your saddle. Backpacks are designed to carry extra items in and your ropes are extra items that can be stored in your backpack or fanny pack. Having pouches dangle and freely swing below your saddle during a hunt is just another possible reason to get picked.
- Assuming you are at a prepared tree and have your ESS on and up around your waist for walking or climbing, at the tree base, take your lineman rope from your pack and put your backpack on. Attach the carabiner on the looped end of the lineman rope to the lineman loop on the right side of the saddle. Slide the other prussic knot/carabiner along the lineman rope until it gets close to the other end. With the prussic knot/carabiner in your right hand, reach around the tree and grab the carabiner with your left hand and pull it around and hook it to the lineman loop on the left side of the saddle.
With both feet somewhat straddling the base of the tree, slide the prussic knot/carabiner along the rope until you can comfortably lean back against the saddle panels and be supported by the lineman rope you just wrapped around the tree.
- As you climb the tree on your steps or sticks, every two or three steps you will need to slightly lean forward and slide the lineman rope farther up the backside of the tree. As you climb you may have to adjust the lineman rope to accommodate the changing diameter of the tree. To adjust, slightly lean forward to somewhat remove your weight tension and slide the prussic knot along the lineman rope to whatever length best suits the changing tree diameter.
- Once up the tree, step up onto your ring of steps or Predator platform and move into the position you want to hunt from and face the tree.
*You will be able to shoot anywhere around the tree but want to position yourself where the least amount of movement will be made for shots where you expect them to be. You want the most likely area you expect a shot opportunity to be, at your 10 to 1-oclock while your position is at 6-oclock so that you can utilize the tree as a blocker until the shot occurs.
- Once in position and facing the tree with the lineman rope still attached, take off your pack and hang it about 120 degrees to your right. Remove the tree tether from the pack and stand straight up on the steps or platform. With the loop end of the tree tether in your right hand and the prussic knot/carabiner near the knotted end of the tether, wrap the tether around the tree and grab the loop with your left hand and bring it around in front of your face and hold it there. Keeping the tether rope against the tree in front of you with your left hand, slide your right hand back along the tether and slip the tether rope through the loop end that is in your left hand and slide the rest of the tree tether and prussic knot/carabiner through the loop until it is completely through and then let it dangle while still holding the loop end against the tree in your left hand.
- Using both hands, slide the tether rope up or down the tree until the loop end is straight in front of your face and at forehead height. While holding the loop end in place against the tree, pull downward on the dangling part of the tether rope until it tightens to the tree at which time you can let go of the tether with both hands. Adjust the carabiner up the tether rope until it is about 18 inches from the tree and then hook the carabiner to the saddles bridge strap. At this point that 18 inches of tether rope should be hanging loosely.
- With the lineman rope still attached and supporting you, lean back against the panels. Slightly loosen the saddles waist belt and lean forward and slide the overlapped ESS panels down until they are under your butt. This should somewhat tighten up the 18 inches of tether rope between the tree to the bridge strap. Reach down and slide the outer panel up until the top of it is just below your waistline, leaving the inner panel under your butt. Retighten the waist belt and if needed, adjust the working length of tether rope between the tree and bridge strap so that the tether rope will support you once you disconnect the lineman rope.
- Remove the lineman rope by unhooking its carabiners from the lineman loops on each side and store the lineman rope in your pack. You are now 100% supported by the tree tether rope and in a hunting position.
- With the tether now supporting you, you can adjust the outer panel for the desired depth of seat needed for your personal comfort and support. To adjust, reach above the prussic knot/carabiner on the tether rope and slightly lift your weight from the seat just enough to be able to adjust the outer panel up or down and ALWAYS leave the inner panel snugly in place under your butt cheeks. The seats depth can be adjusted at any time with this process. I also suggest loosening the waist belt when hunting. It is now time to kill something!!!!
*While this process may seem like it would take some time, once standing on your ring of steps or platform with the lineman rope supporting you, the accumulative amount of time it should take to hook up the tree tether, hook the carabiner to the bridge strap, adjust the saddle panels to the desired depth of seat, and dis-attach the lineman rope should take less than a minute.
*Personally, during a hunt I like to be midway between a sitting and standing position with my knees bent between 30 to 45 degrees. Saddles are designed to sit in, that is why they have a seat. So don’t conform to the many YouTube video’s where hunters are in a standing position as that will make your legs and bottom of your feet bear your weight.
*During a hunt I like the panels to slightly overlapped or just be touching each other so the seat is 9 to 12-inches in depth. For beginners I suggest separating the panels a bit wider as they will feel more comfortable and safer sitting in a deeper 14 to 16-inch seat depth saddle. As they get more comfortable using a saddle, they can narrow the depth as desired and that is one of the many advantages that a 2-panel saddle has over a single panel where the seat depth is a constant.
Descending the tree
- To descend the tree after a hunt, reattach the lineman (safety) rope and adjust it as needed to the tree diameter and so that it is now your main support rope. With the tether still attached, slide the outer panel back down until it overlaps the inner panel under your butt. With both panels overlapped slide them both up above your waist (just as they were when you were climbing the tree) and tighten the waist belt.
- With your lineman rope as your main support, remove the tree tether and put in in your pack and descend in the exact opposite manner that you ascended by using the lineman rope.
- Once on the ground remove the lineman rope and go on about the business of recovering and dragging out the deer you slid your arrow through.
Here are some of the advantages of an ESS over other saddles
#1 From a hunting, comfort and killing perspective, the ability to instantly adjust the seat depth from 6 to 24 inches is a huge advantage. New saddle hunters may want a deeper seat so they feel more secure, while experienced saddle hunters want a saddle that just cradles their lower butt so they have more upper body mobility for twisting at the waist. The higher a saddle rides up into your waistline or above, the more it locks your upper body to your lower body making it difficult to twist at the waist for shots somewhat behind you.
#2 The inner seat panel moves independently from the outer panel so it remains under your butt at all times and NEVER rides up as almost every single panel saddle does. With single panel saddles, having to periodically lift your weight up to pull the seat back down under your butt due to the saddle riding up is a pain and with an ESS that is never an issue.
#3 The comfort of the ESS is second to none because each panel consists of two 2 inch wide straps which equates to 8 inches of solid straps that evenly cradle and distribute your weight load and the straps also conform to whatever your butt shape is. Most styles of saddles have a single 2 inch strap along the bottom of the seat that supports the majority of your weight and that can become a weight bearing stress point issue on long term hunts.
#4 Two panel saddles eliminate hip pinch. With an ESS hip pinch is not an issue because you can separate the panels so they are not covering the tips of your hip bones on each side.
#5 The ESS was designed for functionality, not for cosmetics. Tethrd’s and my original design and prototype had a beautiful cosmetic covering over the exterior of each panel and when I went in a tree and used it, I hated it and went back to the exposed panel straps. During a hunt with an ESS you can reach down behind you and slide your index finger under the top strap of the outer panel to lift the panel up easily, or if you want to lower the outer panel you can slide your thumb down over the lower strap of the outer panel to slide the panel down. Had we gone with our original design of having an exterior fabric covering the panel’s as most other 2 panel saddle have, using a thumb and an index finger the user would have to tightly pinch the fabric covered outer panel to pull it up or down and that requires more effort and more importantly, time.
#6 The smooth Aluminum D-Rings allow the bridge strap to freely and automatically slide into position whenever the seat depth is adjusted. Just as a prussic knot tightens on the rope whenever there is weight against it, a rope or fabric bridge strap will tighten to a fabric bridge loop whenever their is weight against it and on saddles with fabric bridge loops, the bridge rope or strap will have to manually adjusted for comfort.
#7 The D-ring slots allow the saddle panels to freely slide to whatever length and position they need to be in, whenever you adjust the seats depth.
#8 Even the slightly angled D-rings serve a function in widening the hip area of the saddle for additional comfort.
-The working or killing end of a saddle should include comfort, versatility of seat depth for different situations, upper body mobility and ease of use DURING THE HUNT. All of these killing features go hand in hand with being able to smoothly step around the tree from your original hunting position for 360 degree shot opportunities and to keep from getting picked. Anything outside the actual killing period spent in a saddle is peripheral and requires a short term learning curve.